Front Squat: The Ultimate Guide

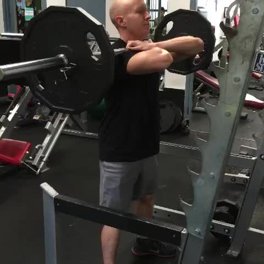
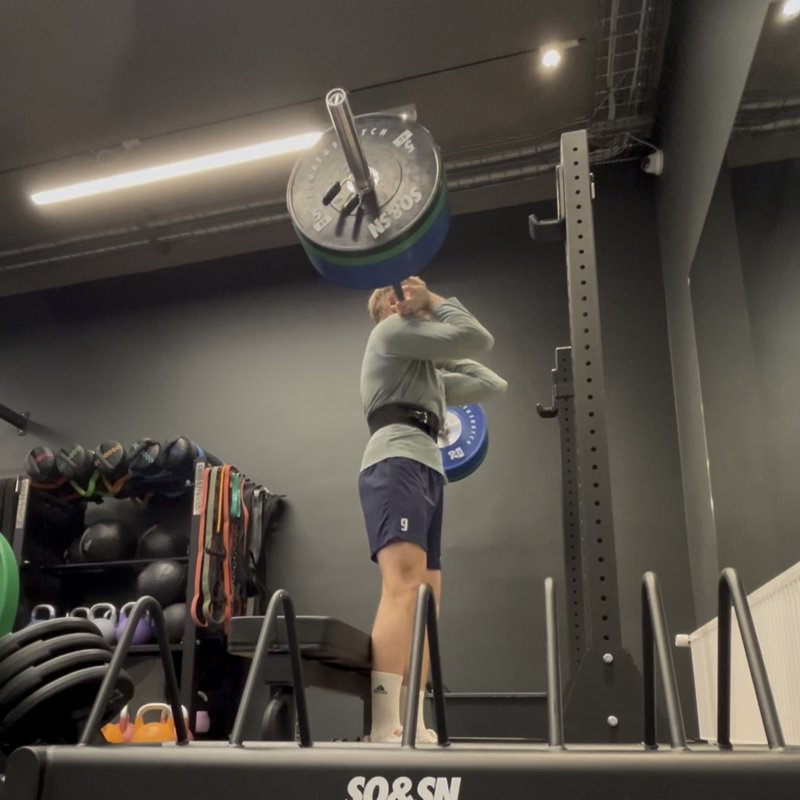
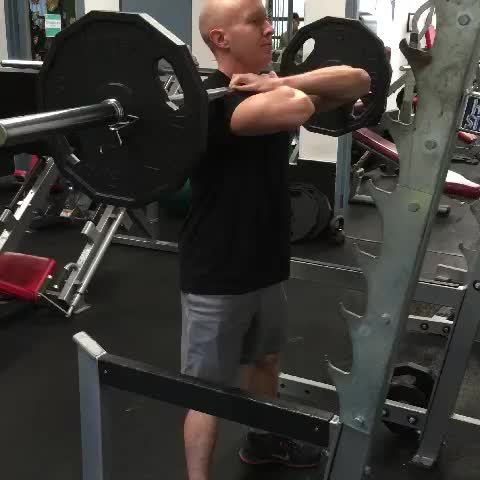
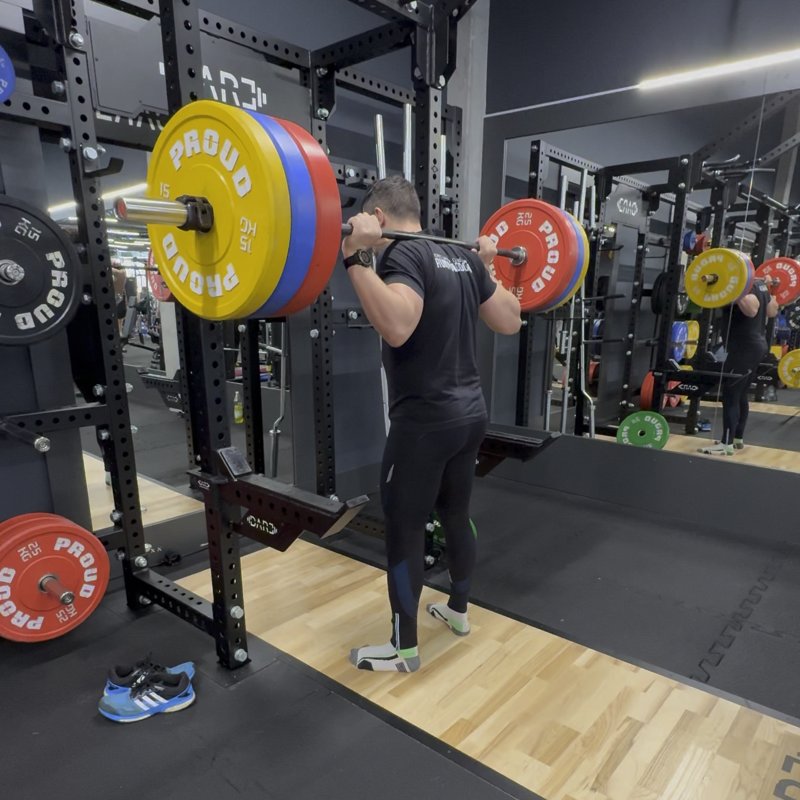
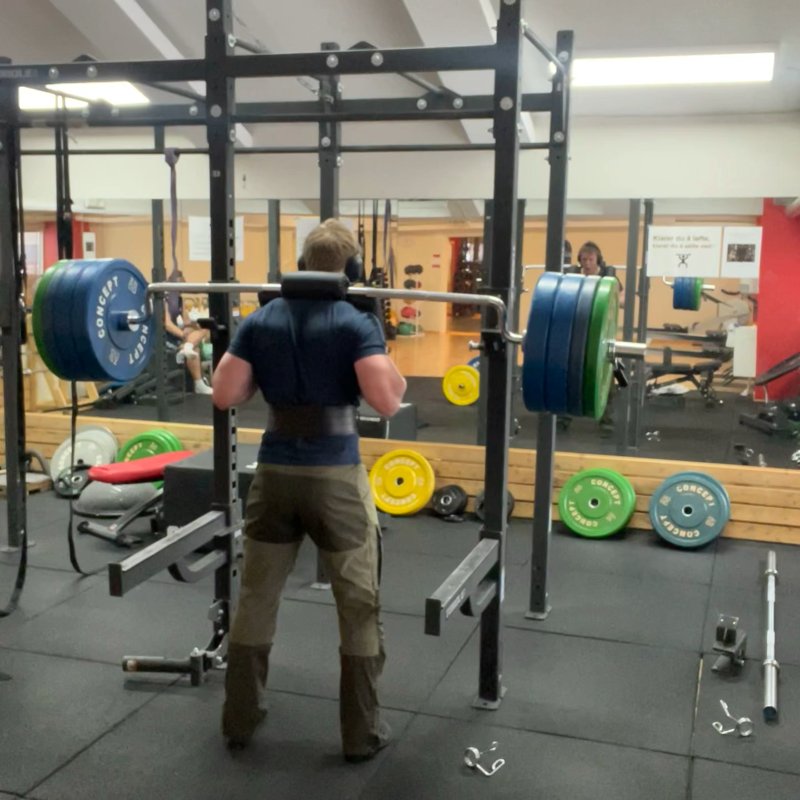
The Front Squat is a compound lower body exercise performed with a barbell held across the front of the shoulders, primarily targeting the quadriceps, core, and upper back while placing less stress on the lower back compared to traditional back squats.

By the Gravitus Team

Front Squat demonstration

Quick Facts

Key Benefit

Quadriceps development with reduced lower back stress

Primary Muscles

Abdominals, Erector Spinae, Glutes, Quadriceps

Secondary Muscles

Anterior Deltoids, Calves, Forearms, Hamstrings, Hip Adductors, Traps

Equipment

barbell, power rack

Difficulty

Intermediate

Type

Compound

Track Your Front Squat Progress

Log sets, track PRs, and see your strength gains over time.

star star star star star
8,000+ App Store Ratings
Download Gravitus from the App Store

The Front Squat stands as one of the most effective and functional lower body exercises in the strength training arsenal. Unlike the traditional back squat where the barbell rests across the upper back, the front squat positions the bar across the front of the shoulders, creating a fundamentally different loading pattern that offers unique benefits and challenges. This position forces a more upright torso angle throughout the movement, which significantly reduces shear forces on the lumbar spine while placing greater emphasis on the quadriceps and core musculature. The anterior loading also demands substantial upper back strength and thoracic spine mobility to maintain proper positioning. Beyond its primary benefits for quadriceps development, the front squat serves as an excellent core strengthener due to the constant anti-flexion demand placed on the abdominals and spinal erectors. The movement pattern also closely mimics many athletic and daily life activities that require lifting with an upright torso position. Whether your goal is to build impressive quadriceps development, improve core strength, enhance Olympic weightlifting performance, or train around certain lower back limitations, the front squat delivers exceptional results when performed with proper technique and programming.

Benefits of Front Squats

The front squat offers several distinct advantages that make it a valuable addition to most strength training programs.

Quadriceps Emphasis

The upright torso position shifts greater emphasis to the quadriceps compared to back squats, making it superior for front thigh development.

Reduced Lower Back Stress

The more vertical back angle significantly decreases compressive and shear forces on the lumbar spine compared to back squats.

Core Strengthening

The anterior bar position creates a substantial anti-flexion demand on the core musculature, developing functional abdominal and back strength.

Improved Posture

Regular front squatting strengthens the upper back muscles that support proper spinal alignment and shoulder positioning.

Carryover to Athletics

The movement closely mimics athletic positions and lifting mechanics found in sports and daily activities.

Accessibility Alternative

Provides an effective squatting option for those with shoulder mobility limitations that restrict back squat performance.

Proper Form & Technique

Setup

  1. Set the barbell in a rack at approximately upper chest height.
  2. Approach the bar with feet hip-width apart, positioning yourself directly under the barbell.
  3. Place your fingertips under the bar outside shoulder width with elbows high (clean grip), or cross your arms to create a shelf with the front delts (cross-arm grip).
  4. Step forward to bring the bar across the front of your shoulders, resting on the front deltoids and clavicles.
  5. Lift your elbows high to create a secure "shelf" for the bar—elbows should point forward and up, parallel to the floor.
  6. Step back from the rack with controlled steps, establishing a squat stance with feet shoulder-width or slightly wider apart.
  7. Position feet with toes pointing slightly outward (10-30 degrees based on individual anatomy).
  8. Distribute weight evenly across the entire foot, with pressure through the mid-foot.
  9. Brace your core and maintain a tall chest position before initiating the descent.

Descent

  1. Take a deep breath into your diaphragm and brace your core, creating 360-degree tension around your midsection.
  2. Initiate the movement by breaking simultaneously at the hips and knees.
  3. Descend by pushing your hips back slightly while allowing your knees to track in line with your toes.
  4. Keep your torso as upright as possible throughout the descent—significantly more vertical than in a back squat.
  5. Maintain high elbows and a tight upper back to prevent the bar from rolling forward.
  6. Control the eccentric portion, taking 2-3 seconds for a controlled lowering phase.
  7. Descend until your thighs are at least parallel to the floor, or deeper if mobility allows and goals require.
  8. At the bottom position, ensure your weight remains distributed across the mid-foot, avoiding excessive forward weight shift.

Ascent

  1. Maintain core tension and upper back tightness at the bottom position.
  2. Initiate the ascent by driving your feet into the floor, thinking about pushing the floor away.
  3. Keep your chest up and elbows high throughout the entire movement.
  4. Drive through the mid-foot and heel, avoiding shifting weight forward to the toes.
  5. Extend your knees and hips simultaneously while maintaining an upright torso.
  6. Exhale forcefully near the top portion of the lift (avoid exhaling at the bottom which can reduce stability).
  7. Return to the starting position with hips and knees fully extended, maintaining proper bar position.
  8. Repeat for the desired number of repetitions, or rack the bar by stepping forward with control and replacing it on the supports.

Key Form Tips

Elbow Position

Keep elbows high throughout the entire movement to maintain a secure bar position on the shoulders.

Torso Angle

Focus on staying as upright as possible—this is critical for proper front squat mechanics and safety.

Weight Distribution

Maintain pressure through the mid-foot, avoiding excessive forward weight shift that can cause the heels to lift.

Knee Tracking

Ensure knees track in line with toes throughout the movement, avoiding inward collapse or excessive outward push.

Breathing

Take a big breath before descending, hold it through the bottom position, and exhale during the challenging portion of the ascent.

Wrist Position

If using the clean grip, focus on supporting the bar with your shoulders/fingers rather than forcing your wrists into extreme extension.

Muscles Worked

Primary Muscles

quadriceps: The four muscles at the front of the thigh (rectus femoris, vastus lateralis, vastus medialis, vastus intermedius) that extend the knee joint, receiving greater emphasis in front squats compared to back squats.
glutes: The largest muscle in the buttocks, responsible for hip extension during the ascent phase of the squat.
abdominals: The rectus abdominis, transverse abdominis, and obliques work isometrically to prevent spinal flexion against the anterior load.
erector spinae: The muscles running along the spine that work to maintain an upright torso position throughout the movement.

Secondary Muscles

hip adductors: The inner thigh muscles that assist in stabilizing the hip and knee during the squatting motion.
hamstrings: The muscles at the back of the thigh that assist in hip extension, though they receive less activation in front squats compared to back squats.
traps: The trapezius, rhomboids, and rear deltoids work isometrically to maintain proper bar position and upright posture.
anterior deltoids: The front shoulder muscles that help support the barbell in its position across the front of the shoulders.
forearms: When using the clean grip, these muscles work isometrically to maintain wrist position under the bar.
calves: The gastrocnemius and soleus provide ankle stability throughout the movement, particularly during the deeper portions of the squat.

Common Mistakes and How to Fix Them

Dropping the Elbows

Allowing the elbows to drop causes the barbell to roll forward and the torso to lean, compromising form and safety. Actively focus on keeping your elbows high throughout the entire movement, pointing them forward and slightly upward. Envision trying to point your elbows at the wall in front of you. If maintaining elbow position is challenging, it may indicate insufficient upper back strength or thoracic mobility. Consider supplementary exercises like thoracic extensions over a foam roller and front rack holds to improve these qualities. Additionally, using a cross-arm grip temporarily can help build confidence while developing the mobility for the clean grip.

Excessive Forward Lean

Leaning forward too much shifts emphasis away from the quadriceps and can cause the bar to roll forward. Maintain a more upright torso angle by imagining a string pulling your chest up toward the ceiling. If you find yourself consistently leaning forward, it may indicate ankle mobility limitations. Try elevating your heels slightly on weight plates or wearing weightlifting shoes with a raised heel to improve positioning. Additionally, focus on initiating the squat by breaking at the knees slightly before the hips, which encourages a more vertical shin and torso angle. Strengthening your upper back with exercises like rows and face pulls can also improve your ability to stay upright.

Weight Shifting Forward onto Toes

Allowing your weight to shift to the front of your feet reduces stability and power output. Focus on maintaining pressure through the mid-foot throughout the entire movement. Visualize screwing your feet into the floor to create a stable base. Practice with lighter weights, concentrating on feeling three points of contact with the ground—the ball of your foot, the little toe, and the heel. If forward weight shift persists, check your ankle mobility and consider placing small weight plates under your heels temporarily while working on mobility. Also examine whether you're initiating the movement by breaking at the hips excessively, which can shift your center of gravity forward.

Insufficient Depth

Not squatting deep enough (at least to parallel) limits muscle development and range of motion benefits. Work on gradually increasing squat depth while maintaining proper form. If mobility is limiting your depth, incorporate specific hip and ankle mobility drills into your warm-up routine. Consider using box squats as a depth gauge, gradually decreasing box height as mobility improves. Front squats typically allow for greater depth than back squats due to the more upright torso position, so focus on taking advantage of this benefit. Remember that proper depth is achieved when the crease of the hip drops below the top of the knee, not by looking at knee angle alone.

Wrist Pain with Clean Grip

Excessive wrist extension when using the clean grip can cause discomfort and limit performance. Instead of forcing your hands into a full grip on the bar, use a "fingertip grip" where only your fingers contact the bar, with the bar resting on your deltoids and clavicles. Ensure the bar sits on the "meat" of your shoulders, not directly on bone. Consider using wrist wraps for additional support during the learning phase. Gradually work on wrist and forearm flexibility with specific stretches. If wrist pain persists despite these adjustments, consider using the cross-arm grip or specialized straps designed for front squats until mobility improves.

Knees Caving Inward

Allowing knees to collapse inward (valgus) during the squat increases injury risk and reduces effectiveness. Focus on actively pressing your knees outward in line with your toes throughout the movement, especially during the ascent from the bottom position. Cue yourself to "spread the floor" with your feet, creating external rotation force at the hips. Strengthen the hip abductors and external rotators with targeted exercises like banded side steps, clamshells, and glute bridges. Consider using a light resistance band around the knees during warm-up sets as a proprioceptive reminder to maintain proper knee position. If knee cave is persistent, temporarily reduce loading until proper movement patterns are established.

Exercise Variations

Grip Variations

  • Clean Grip Front Squat

    The traditional approach using a closed grip with elbows high, which provides the most secure bar position but requires significant wrist mobility.

  • Cross Arm Front Squat

    Cross Arm Front Squat

    Crossing arms in front of the chest to create a shelf for the barbell, reducing wrist mobility demands while still maintaining effective loading.

  • Strap Assisted Front Squat

    Strap Assisted Front Squat

    Using lifting straps looped around the bar and held in the hands to reduce wrist extension requirements while learning proper positioning.

Equipment Variations

  • Kettlebell Front Squat

    Holding one or two kettlebells in the front rack position against the shoulders, offering similar benefits with different loading mechanics.

  • Dumbbell Front Squat

    Using dumbbells held at shoulder level in a front rack position, providing an accessible alternative that reduces technical demands.

  • Safety Bar Front Squat

    Utilizing a specialized safety squat bar facing forward to simulate front squat mechanics with reduced upper body mobility requirements.

  • Zercher Squat

    Holding the barbell in the crooks of the elbows, creating a different anterior loading pattern that similarly emphasizes quadriceps and upright posture.

Programming Variations

  • Pause Front Squat

    Adding a deliberate 2-4 second pause at the bottom position to eliminate the stretch reflex and increase time under tension.

  • Tempo Front Squat

    Manipulating the speed of different phases of the movement, such as a slow 4-second descent followed by an explosive ascent.

  • Box Front Squat

    Performing the movement to a box set at parallel or just below, providing a consistent depth target and confidence for those developing the movement.

  • Heels-Elevated Front Squat

    Placing small weight plates under the heels to accommodate limited ankle mobility and allow for greater depth with a more upright torso.

How to Progress

Effective progression with front squats involves more than simply adding weight—it requires systematic development of technique, mobility, and strength at each stage.

Beginner Level

Start with mastering the front rack position before adding significant load. Begin with an empty barbell or even a PVC pipe to practice the rack position and movement pattern. Focus on developing thoracic mobility and upper back strength through supplementary exercises like wall slides and thoracic extensions. If clean grip is challenging, use the cross-arm grip or strap-assisted variations while working on wrist mobility. Perform 2-3 sets of 8-10 repetitions with light weight, emphasizing perfect form and full range of motion. Incorporate front squats 1-2 times weekly, starting with goblet squats if barbell front rack position is initially too challenging. Work on achieving proper depth (thighs at least parallel to floor) with consistent technique before adding substantial weight. Practice bracing techniques and breathing patterns that maintain core stability throughout the movement. Once form is consistent, begin adding weight gradually in 5-10 pound increments.

Intermediate Level

Progress to moderate weights that challenge you in the 5-8 repetition range for 3-4 working sets after appropriate warm-up sets. Begin varying repetition schemes across different training sessions—some focused on strength (3-5 reps), others on hypertrophy (6-10 reps). Implement technique refinements like squat shoes with elevated heels if ankle mobility remains limiting, or continue working with mobility exercises if using flat shoes. Add pause variations (2-3 second hold at bottom position) to eliminate reliance on the stretch reflex and build strength out of the hole. Consider adding front squat-specific accessory work like front rack holds and upper back strengthening exercises. Incorporate tempo work (controlled eccentrics of 3-4 seconds) to increase time under tension and positional awareness. If not already using it, work toward the clean grip for improved stability with heavier weights. Program front squats 1-2 times weekly, potentially as a main movement on one day and a supplementary exercise on another. Begin implementing periodization approaches, cycling between volume and intensity phases.

Advanced Level

Utilize challenging weights in various rep ranges based on specific training goals—lower reps (1-5) for strength focus, moderate reps (6-10) for hypertrophy emphasis. Implement advanced programming techniques like wave loading (undulating intensity within the workout), cluster sets (breaking sets into mini-sets with brief rest periods), or intensity techniques like drop sets for hypertrophy blocks. Experiment with specialized variations like pause squats at different positions, 1½ reps (adding a half rep at the bottom before ascending), or eccentric overload approaches. Consider position-specific work to address sticking points—pin squats or Anderson front squats starting from dead stops at challenging positions. Incorporate front squats with strategic frequency—perhaps heavy front squats as a primary movement one day and lighter, technique-focused front squats on another day. Implement detailed periodization models (linear, undulating, or block) with planned deload weeks every 4-6 weeks. At this level, front squat performance relies heavily on recovery management and systemic factors, so program design should account for overall training stress, not just front squat-specific work. Consider advanced movement analysis (video review, velocity tracking) to optimize technique and loading parameters.

Frequently Asked Questions

Neither exercise is inherently "better"—they offer different benefits that make them complementary rather than competitive. Front squats place greater emphasis on the quadriceps and core while requiring a more upright torso position, which generally reduces stress on the lumbar spine. This makes them particularly valuable for those with certain lower back issues or as a quadriceps-focused alternative. They also require and develop significant upper back strength and thoracic mobility. Back squats typically allow for heavier loading and greater overall muscle mass involvement, particularly in the posterior chain (hamstrings, glutes, and lower back). They're often considered more suited for maximal strength development due to the higher loads possible. For most trainees, incorporating both variations into a training program provides the most comprehensive development. The "best" choice depends on your specific goals, body structure, injury history, and individual biomechanics. Many strength coaches recommend using front squats as an assistance exercise to back squats or alternating emphasis between the two across different training blocks.

Improving the front rack position involves developing mobility in several areas and strengthening the upper back. For thoracic spine mobility, perform foam roller extensions, cat-cow stretches, and wall slides daily. For wrist flexibility, practice wrist extensions and flexions, along with stretches that externally rotate the forearm. For shoulder mobility, focus on lat stretches and pec minor releases using a foam roller or lacrosse ball. For strengthening the upper back, incorporate exercises like face pulls, reverse flyes, and band pull-aparts to improve your ability to maintain an upright posture under load. When practicing the front rack, start with an empty barbell or PVC pipe, focusing on elbow height rather than a full grip on the bar. Many lifters successfully use a "fingertip grip" where only 1-3 fingers contact the bar, rather than forcing a full hand grip. Consider using front rack holds as a specific exercise—simply hold the bar in the front rack position for 20-30 seconds to build comfort and endurance in this position. If mobility is severely limited, temporarily use cross-arm grip or strap-assisted variations while working on the requisite mobility for the clean grip. Consistency is key—regular practice of the front rack position, even with light weights, will gradually improve your comfort and capability.

Feeling front squats primarily in your upper back rather than your legs typically indicates one of several technique issues. First, the upper back fatigue might be from insufficient upper back strength relative to your leg strength—the upper back muscles work isometrically to maintain the front rack position and upright torso, which can be challenging for those new to the movement. This is normal and typically improves with practice. Second, if you're feeling it in your lower back, you may be losing your upright posture during the squat, allowing your chest to drop forward. Focus on keeping your elbows high throughout the movement to maintain an upright torso. Third, you might be initiating the movement incorrectly—front squats work best when you break at the knees slightly before the hips, maintaining a more vertical shin angle. Finally, inadequate core bracing can lead to excessive stress on the back rather than distributed loading through the legs. Practice 360-degree bracing before descending to create a rigid torso that transfers force effectively. As you adapt to the movement pattern and build specific strength in the supporting muscles, the sensation should shift more toward the quadriceps as the primary working muscle group.

Optimal squat depth depends on your specific goals, mobility limitations, and individual anatomy. For most trainees seeking balanced muscle development, descending until your thighs are at least parallel to the floor (femurs horizontal) provides an effective range of motion that engages the quadriceps, glutes, and core through a substantial portion of their functional range. Front squats typically allow for greater depth than back squats due to the more upright torso position, and many lifters can achieve a full "ass-to-grass" position more comfortably with front squats. This deeper position can provide additional quadriceps development and mobility benefits, but should only be pursued if it can be maintained with proper form. Depth should never come at the expense of proper posture—if your lower back rounds, heels rise, or torso excessively leans forward as you descend deeper, limit your depth to the point where you can maintain proper alignment. For Olympic weightlifting purposes, developing comfort in a deep front squat is particularly valuable for receiving the clean. If you're training specifically for powerlifting carryover, achieving similar depth to your competition squat creates more direct transfer. For rehabilitation purposes or when working around specific limitations, partial ranges may be deliberately programmed.

The optimal frequency for front squats depends on your overall program design, recovery capacity, and specific goals. For general strength and hypertrophy purposes, most trainees benefit from front squatting 1-2 times per week. If you're following a traditional body part split, you might perform front squats on your designated leg day once per week. With an upper/lower split, they could be included in one of your two weekly lower body workouts. For full-body training, they might appear in 1-2 of your 3-4 weekly workouts. Advanced lifters and Olympic weightlifters may front squat more frequently, sometimes 2-3 times weekly with varied intensities and volumes. Consider your overall lower body training volume and recovery capacity—front squats are just one component of leg development that should be balanced with other squat variations, hinge patterns, and single-leg work. The relatively lower absolute loads used in front squats compared to back squats may allow for slightly higher frequency in some cases, but overall systemic fatigue still needs to be managed. Pay attention to performance indicators—if strength decreases between sessions or you experience persistent joint discomfort, you may need more recovery time or reduced volume. For most trainees, 1-2 sessions per week including front squats, with at least 48-72 hours between sessions targeting the same movement pattern, provides an effective stimulus while allowing sufficient recovery.

Video Demonstrations

Front Squat video demonstration

Log in to watch video demonstrations

Login to Watch

3 video demonstrations available

Find more video demonstrations in the Gravitus app

Tips from the Community

  • Avatar for Brian Madden

    For this reason, I highly recommend using a clean grip, which also has better carryover to proper techniques involved with any Olympic lifts as well as overhead pressing. It may feel uncomfortable at first, but remember to keep a proud chest and get those elbows up. It's okay to remove a finger or two from under the bar (I like to remove my thumb and pinky finger as it helps take stress off the wrists and allows for the elbows to stay up).

  • Avatar for Joan Escolano Ellefson

    They do suck, but do it. 😤 <- beast mode face.

Ready to get serious about your Front Squat?

Download Gravitus to track your sets, monitor PRs, and follow structured programs built around exercises like this.

star icon star icon star icon star icon star icon
8,000+ App Store Ratings
Download Gravitus workout tracker from the iOS App Store

Helpful Resources

Front Squat Strength Standards

See how your Front Squat compares to other lifters. Check strength standards by bodyweight and gender.

View Strength Standards

One Rep Max Calculator

Find your one rep max for any exercise without maximal testing. Essential for developing effective strength training programs.

Calculate 1RM

Workout Programs

Follow structured workout programs created by fitness professionals to maximize your strength and muscle gains.

View Programs
Track Your Front Squat
Log sets, track PRs, see your gains
Download