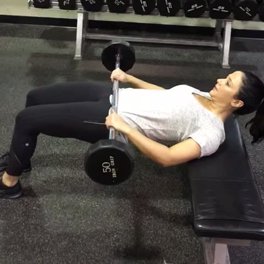
Barbell Hip Thrust: The Ultimate Guide
The Barbell Hip Thrust is a lower body exercise that primarily targets the glutes through hip extension by driving a weighted barbell upward from a supported upper back position, creating one of the most effective movements for glute development and activation.

Quick Facts
Key Benefit
Maximum glute activation and development
Primary Muscles
Glutes
Secondary Muscles
Abdominals, Erector Spinae, Hamstrings, Hip Adductors, Quadriceps
Equipment
barbell, flat bench
Difficulty
Intermediate
Type
Strength
In This Guide
Ready to master the Barbell Hip Thrust?
Track your progress, see improvements over time, and build strength consistently.
Download GravitusThe Barbell Hip Thrust has revolutionized glute training, emerging as one of the most effective exercises for developing the posterior chain, particularly the gluteus maximus. Popularized by researcher and strength coach Bret Contreras, this exercise has become a staple in strength training, physique development, and sports performance programs worldwide. What makes the Hip Thrust uniquely effective is its ability to maintain high levels of tension on the glutes throughout the entire range of motion while allowing for substantial loading. Unlike many traditional lower body exercises where glute activation may diminish at certain points in the movement, the Hip Thrust keeps the glutes under constant tension at the key positions where they generate the most force. Beyond aesthetic benefits, strong glutes contribute significantly to athletic performance, injury prevention, and daily function. The glutes are the largest and potentially strongest muscles in the human body, playing a crucial role in movements like running, jumping, climbing, and lifting. Weak or underactive glutes can contribute to lower back pain, knee issues, and hamstring strains. Whether your goal is to improve your physique, enhance athletic performance, reduce pain, or simply develop functional strength for everyday activities, the Barbell Hip Thrust deserves consideration as a cornerstone exercise in your training program. Its versatility, effectiveness, and ability to be scaled make it suitable for nearly all training populations when properly executed.
Benefits of Barbell Hip Thrusts
The Barbell Hip Thrust offers numerous benefits that make it a valuable addition to virtually any resistance training program.
Maximum Glute Activation
Research shows Hip Thrusts elicit higher gluteal muscle activation than squats, deadlifts, and other traditional lower body exercises.
Low Back-Friendly
Places minimal stress on the lumbar spine compared to many other loaded lower body exercises, making it accessible for many individuals with back concerns.
Performance Carryover
Strengthens hip extension, a fundamental movement pattern critical for sprinting, jumping, and many athletic movements.
Progressive Overload Potential
Allows for substantial loading and clear progression metrics, making it excellent for continued strength development over time.
Posture Improvement
Strengthening the glutes can help counteract the effects of prolonged sitting and improve overall posture and alignment.
Proper Form & Technique
Setup
- Position a flat bench perpendicular to your body, with the long edge against your mid-back area.
- Sit on the floor with your upper back against the bench edge, knees bent, and feet flat on the floor about shoulder-width apart.
- Roll a loaded barbell over your legs until it rests comfortably in the crease of your hips.
- Place a barbell pad, squat pad, or folded towel between the barbell and your hips for comfort and protection.
- Position your feet so that at the top of the movement, your shins will be vertical or slightly angled forward.
- Grasp the barbell with an overhand grip, hands positioned outside your hips to stabilize the bar.
- Ensure your chin is slightly tucked and your spine is in a neutral position.
- Brace your core to maintain stability throughout the movement.
Movement
- Drive through your heels and push your hips upward, extending until your body forms a straight line from shoulders to knees.
- Focus on squeezing your glutes at the top position, ensuring your hips reach full extension.
- At the top, your torso and thighs should form approximately a 90-degree angle, with shins vertical or slightly angled.
- Maintain a neutral spine throughout the movement—avoid excessive arching of the lower back.
- Hold the contracted position momentarily, focusing on maximum glute engagement.
- Lower the barbell with control, allowing your hips to descend toward the floor without touching down completely.
- Maintain tension in your glutes at the bottom position, not allowing your weight to fully rest on the floor.
- Immediately begin the next repetition, maintaining control throughout the set.
Key Form Tips
Foot Placement
Position your feet so that your knees form approximately a 90-degree angle at the top of the movement for optimal force production.
Glute Focus
Think about pushing the floor away with your heels and squeezing your glutes, rather than just lifting the weight with your legs.
Hip Position
Drive your hips fully upward at the top position, but avoid excessive overextension that could strain your lower back.
Head Position
Keep your chin slightly tucked and gaze forward or slightly downward to maintain neutral cervical spine alignment.
Bar Path
The barbell should move vertically up and down, without rolling forward or backward on your hips during the movement.
Muscles Worked
Primary Muscles
- glutes: The gluteal muscles, particularly the gluteus maximus (the largest of the group), are the primary target of this exercise, responsible for powerful hip extension, stability, and pelvic control throughout the movement.
Secondary Muscles
- hamstrings: Assist in hip extension and knee flexion during the movement, particularly the biceps femoris.
- quadriceps: Provide knee stabilization and assist in the movement, especially the rectus femoris which crosses the hip joint.
- erector spinae: Activate to maintain spinal position and posture throughout the exercise.
- hip adductors: Provide inner thigh support and assist in maintaining proper leg position during the thrust.
- abdominals: Engage isometrically to maintain pelvic position and spinal alignment throughout the movement.
Common Mistakes and How to Fix Them
Excessive Lumbar Extension
Arching the lower back too much at the top of the movement, placing stress on the spine rather than the glutes. Focus on a posterior pelvic tilt at the top position by squeezing your glutes and lightly drawing your ribs down. Practice the movement with bodyweight only until you can maintain proper position, then gradually add load.
Insufficient Hip Extension
Not reaching full hip extension at the top, limiting glute activation and results. Ensure your hips rise to a position where your torso and thighs form roughly a 90-degree angle. Think about creating a straight line from shoulders to knees at the top position. If necessary, film yourself from the side to check your alignment.
Using Momentum
Bouncing at the bottom of the movement or using excessive speed rather than controlled contractions. Implement a brief pause at the bottom of each repetition, maintaining tension rather than allowing the weight to fully rest on the floor. Focus on a controlled tempo throughout the entire set, especially as fatigue builds.
Improper Foot Placement
Positioning feet too close to the body or too far away, compromising leverage and glute activation. Experiment to find your optimal foot position, typically where your shins are vertical at the top of the movement. Different leg lengths and body proportions may require individualized positioning. When in doubt, position your feet so that your knees form approximately a 90-degree angle at the top of the thrust.
Neck Strain
Looking up or craning the neck during the movement, potentially causing cervical strain. Maintain a neutral neck position by keeping your chin slightly tucked throughout the movement. Focus your gaze on a spot on the floor or ceiling that allows your neck to stay aligned with your spine. Avoid the urge to watch your hips rise, particularly when learning the movement.
Barbell Hip Thrust Variations
Resistance Variations
-
Bodyweight Hip Thrust
Performed without added resistance, ideal for beginners learning the movement pattern or as a warm-up exercise.
-
Banded Hip Thrust
Using a resistance band around the knees or over the hips to provide accommodating resistance, increasing tension at the top of the movement.
-
Dumbbell Hip Thrust
Using one or two dumbbells placed on the hips, suitable when a barbell is unavailable or for gradual progression.
-
Single Leg Hip Thrust
Performed with one leg extended, creating an asymmetrical challenge that addresses strength imbalances and increases difficulty.
Technical Variations
-
Feet-Elevated Hip Thrust
Placing feet on an elevated surface to increase range of motion and alter the resistance curve, increasing glute activation.
-
Banded March Hip Thrust
Holding the top position while alternately lifting each foot slightly off the ground, significantly increasing stability demands.
-
Pause Hip Thrust
Implementing a 2-3 second pause at the top position to eliminate momentum and increase time under tension.
-
Tempo Hip Thrust
Manipulating the timing of the concentric and eccentric phases (e.g., 2 seconds up, 1 second hold, 3 seconds down) to increase time under tension.
Frequently Asked Questions
The appropriate weight for barbell hip thrusts varies significantly depending on individual strength levels, training history, and goals. The glutes are potentially the strongest muscles in the human body, and many trainees are surprised by how much weight they can eventually handle with proper progression.
Beginners should start with bodyweight only to master the movement pattern before adding a light barbell (45 lbs/20 kg) or dumbbell. Intermediate lifters commonly work with weights ranging from 135-225 lbs (60-100 kg), while advanced lifters might use 225-405+ lbs (100-180+ kg) or more, with elite lifters sometimes exceeding twice their bodyweight.
Rather than targeting a specific weight, focus on proper form and progression principles. Select a weight that allows you to complete your target repetitions with the last 2-3 reps being challenging while maintaining good technique. For hypertrophy-focused training, working in the 8-15 repetition range with moderate-heavy weight typically provides optimal stimulus. If your goal is maximal strength development, heavier loads with 5-8 repetitions might be more appropriate.
Most importantly, progress at your own pace, adding weight incrementally (5-10 lbs/2.5-5 kg at a time) when you can complete all planned sets and repetitions with good form.
Neither exercise is inherently "better" - they offer different benefits and work optimally when used complementarily rather than exclusively. Research has shown that barbell hip thrusts typically produce higher gluteus maximus activation than squats, particularly in the fully contracted position.
Hip thrusts directly target hip extension, the primary function of the glutes, with a resistance profile that maximizes tension at the point of peak contraction. They also allow for substantial loading with minimal technical complexity compared to squats. However, squats offer their own unique benefits, including greater quadriceps involvement, more significant core and upper back demands, greater overall metabolic stress, and potentially more functional carryover to certain movement patterns.
For optimal lower body development, most trainees benefit from including both exercises in their program. Hip thrusts might be prioritized for those with specific glute development goals or who have limitations that make squatting difficult. A common approach is to include both exercises in a lower body session (perhaps with squats first for overall leg development, followed by hip thrusts for targeted glute work) or to alternate focus between sessions (squats on one lower body day, hip thrusts on another).
You should primarily feel barbell hip thrusts working in your gluteus maximus (the largest glute muscle), with noticeable tension and fatigue developing throughout the set. Many people also feel secondary involvement in the hamstrings, particularly if their foot position results in greater hamstring recruitment. Some quadriceps activation is normal, especially as you approach fatigue, but should not dominate the movement.
If you feel significant lower back engagement or discomfort, you may need to adjust your technique to focus more on posterior pelvic tilt at the top position. If you're feeling the exercise primarily in your hamstrings rather than your glutes, try these adjustments - move your feet slightly further away from your body, focus on driving your knees outward slightly during the movement, and consciously engage your glutes throughout the entire repetition.
Pre-activating your glutes with simple exercises like clamshells or glute bridges before performing hip thrusts can enhance mind-muscle connection. Foot position significantly impacts muscle recruitment patterns - experimenting with slight adjustments in foot placement can help you find the position that maximizes glute engagement for your individual body mechanics. With proper technique, you should feel a distinct "burn" in the glute muscles as you approach fatigue, particularly at the top contracted position.
While not absolutely necessary, some form of padding between the barbell and your hip bones is highly recommended for comfort and injury prevention. The bony structure of the hips is not well-designed to support direct pressure from a loaded barbell, and performing hip thrusts without padding often leads to bruising, pain, and an inability to use sufficient weight for effective training.
Several padding options exist - Purpose-built hip thrust pads (often made of dense foam with a cutout for the barbell) provide the most comfort and stability for dedicated hip thrust training. Standard barbell pads or squat pads (designed for protecting the neck during back squats) work well for most people and are more versatile for other exercises. Folded yoga mats or towels can work in a pinch but tend to roll or compress under heavier loads. Specialized products like the Hip Thruster or similar equipment eliminate the need for a separate pad by incorporating cushioning into the design.
For beginners or those using moderate weight, almost any padding solution will suffice. As you progress to heavier loads (200+ lbs/90+ kg), investing in a dedicated barbell pad or hip thrust-specific equipment becomes increasingly worthwhile for comfort and performance. Whatever padding you choose, ensure it stays securely in place throughout your set and provides enough cushioning to allow you to focus on the exercise rather than discomfort.
Video Demonstrations

Log in to watch video demonstrations
Login to Watch3 video demonstrations available
Find more video demonstrations in the Gravitus app
Tips from the Community
-
Squeeze & hold at top for max burn
-
Point your feet outward to target the glutes. Don’t have your shoulders too far up on the bench.
-
Keep head looking forward, not at ceiling.
-
Push off heels and push knees outwards
-
Position your feet so that your shins are perpendicular to the ground at the top of the movement.
Track your progress with Gravitus
Download Gravitus to log your workouts, track your progress, and join a community of fitness enthusiasts.
Helpful Resources
One Rep Max Calculator
Find your one rep max for any exercise without maximal testing. Essential for developing effective strength training programs.
Calculate 1RMWorkout Programs
Follow structured workout programs created by fitness professionals to maximize your strength and muscle gains.
View Programs